
Kurs:Photoshop Einzellösungen/en/Vertical Stitching of Geometrically Clearly Defined Objects
This course addresses beginners. The editing steps are kept simple on purpose.
Initial Situation
[Bearbeiten]Certain circumstances do not allow you to photograph an object from the necessary distance and so you take several photos slightly staggered:


The slightly different lighting situations can be ignored for now. It's clearly visible that the vertical lines significantly differ. But this is not a problem.
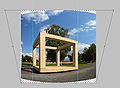
Automated Stiching
[Bearbeiten]File -> Automate -> Photomerge...
Layout stays set to Auto, set check mark to
- Vignette Removal
- Geometric Distortion Correction
and than click ok, result:

Amend Compilation
[Bearbeiten]- Use
<Ctrl>+<E>to reduce the 4 single layers to one layer - Use
<Ctrl>+<Shift>+<L>for auto color correction (Auto Levels) - Use
Edit -> Transform -> Distortto correct the perspective distortion - the full image is cutted out along the visible borderlines
- Use
Edit -> Transform -> Warpto adjust the horizontal lines
-
 Use guides to adjust the vertical lines correctly
 -
 distort upwards, the object would be too wide
 -
 the horizontals are adjusted by eye


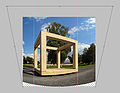
Final Result
[Bearbeiten]
Not optimal but usable. The path and the bottom edge are still crooked and could be corrected - but not necessarily need to be.